What Do I Need to Start Putting on Makeup?
What Do I Need to Start Putting on Makeup? Beginner Guide & Essentials
Why Makeup Feels Confusing at First
Walking into a beauty store for the first time can feel like entering a labyrinth. Rows upon rows of sleek bottles, vibrant palettes, and strangely shaped tools stare back at you, each promising a different version of “perfection.” For a beginner, the sheer volume of information—compounded by thousands of social media tutorials and ever-changing trends—can be utterly overwhelming. It is completely normal to feel confused about where to start, what to buy, and how to use it without looking like you are wearing a mask.
The most important thing to remember as you embark on this journey is that the primary purpose of makeup is enhancement, not transformation. While artistic, high-glamour looks are impressive, they aren’t the mandatory starting point. Makeup is a tool designed to highlight your favorite features, evening out your skin tone or making your eyes pop, while still allowing the real you to shine through. You do not need a hundred different products to look “put together.” In fact, starting with a massive haul of expensive products is often a recipe for frustration because you haven’t yet learned what works for your unique face.
Read: How to Lose Thigh Fat: Diet & Exercise Strategies for Defined Legs
Expectations are key. A simple, five-step routine is more than enough to create a polished, confident appearance. This guide is designed to strip away the noise and focus on the essentials. By the end, you will understand that makeup isn’t about hiding; it’s about the creative joy of presenting yourself to the world in a way that makes you feel your best.
Understanding Your Skin Before Makeup
Before you ever pick up a foundation bottle, you must understand the canvas you are working on: your skin. Applying makeup to unprepared skin is like trying to paint a wall that hasn’t been sanded or primed; the results will rarely be smooth. Identifying your skin type is the first and most crucial step in choosing products that will actually stay on your face and look natural.
There are generally five skin types. Oily skin often appears shiny, especially in the “T-zone” (forehead, nose, and chin), and is prone to enlarged pores. Dry skin may feel tight, look flaky, or appear dull. Combination skin is exactly what it sounds like—usually oily in the T-zone but dry or normal on the cheeks. Normal skin is well-balanced, neither too oily nor too dry. Finally, sensitive skin reacts easily to new products, often becoming red or itchy.
Your skin type dictates the formula of the products you should buy. For example, someone with oily skin should look for “matte” or “oil-free” foundations to prevent sliding, while someone with dry skin needs “hydrating” or “dewy” formulas to avoid a cakey finish. Beyond type, basic skincare is the foundation of any look. A consistent routine of cleansing to remove impurities, moisturizing to create a smooth surface, and applying sunscreen to protect against damage is non-negotiable. When your skin is healthy and hydrated, you will find that you actually need less makeup to achieve a radiant look. Makeup sits better, blends easier, and lasts longer on a well-maintained complexion.
Read:Losing Abdominal Fat: Your Roadmap to Belly Fat Reduction
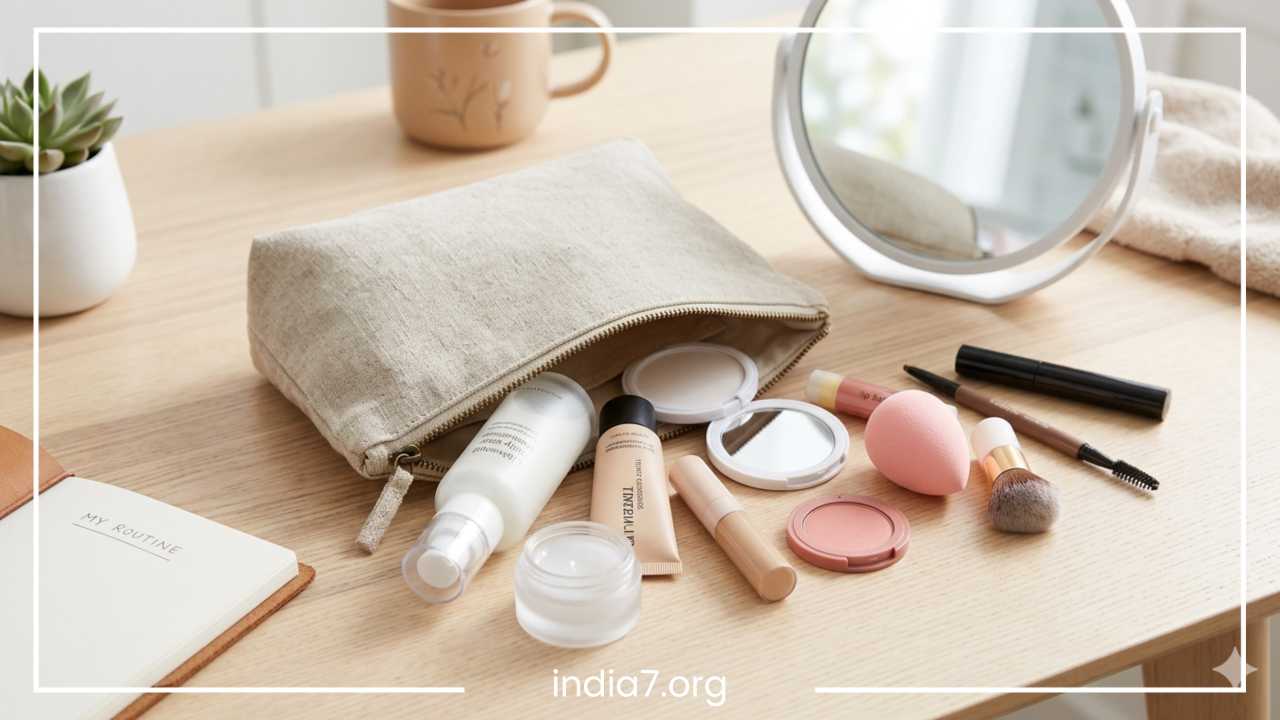
Basic Tools You Actually Need
In the world of beauty, tools are just as important as the products themselves. While your fingers can be great for blending certain creams, having a few dedicated tools will significantly improve the finish of your makeup. The classic debate for beginners is usually brushes versus sponges. Makeup sponges, like the teardrop-shaped beauty blenders, are fantastic for a seamless, “airbrushed” finish, especially with liquid products. Brushes, on the other hand, offer more precision and are better suited for powders.
As a beginner, you don’t need a 24-piece professional set. You only need a few workhorse tools:
-
Foundation Brush or Sponge: To even out your base without streaks.
-
Powder Brush: A large, fluffy brush to lightly dust setting powder over your face.
-
Small Blending Brush: This is essential for eyeshadow. A soft, tapered brush allows you to blend colors into the crease of your eye so there are no harsh lines.
-
Eyebrow Brush/Spoolie: Often found on the end of brow pencils, this looks like a clean mascara wand and is used to brush your brow hairs into place and soften any harsh pencil lines.
Hygiene is the final, vital component of tool ownership. Brushes and sponges collect old makeup, oils from your skin, and bacteria. Using dirty tools can lead to breakouts and uneven application. Aim to wash your sponges after every few uses and deep-clean your brushes at least once a week with a gentle cleanser or specialized brush soap. Keeping your tools clean is an investment in both your makeup quality and your skin health.
Read: How to Lose Love Handles
Essential Base Makeup Products
The “base” refers to the products that cover the majority of your face to create a uniform skin tone. While the options are endless, most beginners should focus on a few key items. First is moisturizer, which acts as the ultimate prep step. Even if you have oily skin, moisturizer is necessary to prevent the makeup from clinging to dry patches. Following this, you might consider a primer. While optional, primers act as a “buffer” between your skin and makeup, helping to fill in pores, control oil, or add a boost of hydration, which helps your look last through the day.
When it comes to foundation, there are three main coverage levels. Light coverage (like BB creams or tinted moisturizers) is perfect for a “no-makeup” look. Medium coverage hides more redness and blemishes but still looks like skin. Full coverage is best for photography or evening events where you want a completely flawless finish. Concealer is the foundation’s partner; it is more pigmented and designed for specific spots, such as dark under-eye circles or a stubborn blemish.
Finding the right shade is the biggest hurdle for most. Always test foundation on your jawline, not your hand, as your hand is usually a different color than your face. The right shade should disappear into your skin. To finish the base, a light setting powder is used to “lock” the liquid products in place, preventing them from creasing or melting off. For beginners, a translucent powder is safest as it won’t change the color of the foundation you just carefully selected.
Simple Face Routine for Beginners
Now that you have the products, how do you put them on? A logical order of operations ensures that your makeup stays fresh and doesn’t get “muddy.” Start by cleansing and moisturizing. Wait about two or three minutes for your moisturizer to sink in; if the skin is too wet, the makeup will slide around. If you choose to use a primer, apply a pea-sized amount and spread it evenly across your face.
When applying foundation, start in the center of your face (where most redness occurs) and blend outward toward your ears and hairline. Use a damp sponge for a natural finish or a brush for more coverage. The goal is to “stipple” or “pounce” the product onto the skin rather than rubbing it, which can cause streaks. Next, apply concealer. For under-eyes, use a small amount in the inner corner and outer corner of the eye, then blend. For spots, dab directly onto the blemish and let it sit for thirty seconds before blending the edges; this gives you maximum coverage.
The final step is setting powder. Using your large fluffy brush, tap off the excess powder and lightly press it into the areas that get oily or where you applied concealer. Avoid sweeping the brush aggressively, as this can move the wet foundation underneath. The biggest secret to avoiding a “cakey” look is using less product than you think you need. You can always add more, but it is much harder to take it away once it’s on. Blending is your best friend—take an extra minute to ensure there are no visible lines at the jaw or neck.
Eye Makeup Basics
Eyes are often considered the focal point of the face, but they don’t require a complex “cut-crease” to look beautiful. Start with eyebrow grooming. Well-shaped brows frame the face and provide an instant lift. Use a spoolie to brush them up, and then use a brow pencil or powder that matches your hair color to fill in any sparse gaps with light, hair-like strokes. If your brows are already full, a clear brow gel is all you need to keep them in place.
For eyeshadow, stick to a small palette of neutral shades like beige, tan, or soft brown. Apply a light shade across the entire lid and a slightly darker shade in the “crease” (the fold of your eyelid) to add depth. Eyeliner can be intimidating, so start with a pencil. It’s much more forgiving than liquid liner because you can smudge it slightly for a soft, smoky look. Run the pencil along your upper lash line as close to the lashes as possible to make them look thicker.
Finally, mascara is the magic wand of makeup. It opens the eyes and makes you look more awake. When applying, wiggle the wand at the base of your lashes and sweep upward. For safety, never share mascara with others, and replace your tube every three months to avoid eye infections. If you are a beginner, a single coat of black or brown mascara is usually enough to provide a natural, clean look.
Lip Products You Can Start With
Lip color is the easiest way to change your look with minimal effort. However, before applying color, lip balm is essential. Chapped lips will cause lipstick to settle into cracks and look uneven. Applying balm at the start of your routine gives it time to soak in before you reach the lip stage.
For beginners, there are several paths to take:
-
Tinted Balms: These provide a sheer wash of color and plenty of hydration. They are perfect for those who are “lip-shy” and don’t want a bold look.
-
Lip Gloss: Gloss adds shine and makes lips look fuller. Modern glosses are often non-sticky and very comfortable for all-day wear.
-
Lipstick: If you want more impact, lipsticks come in various finishes. Matte is flat and long-lasting, while Satin or Cream has a slight sheen and feels more moisturizing.
Choosing an everyday shade usually involves finding a “my lips but better” color—typically a soft pink, mauve, or nude that is just a shade or two deeper than your natural lip tone. While lip liner is optional, it can help define the shape of your mouth and prevent lipstick from “bleeding” into the skin around the lips. Just remember to keep your lips hydrated; a healthy smile is the best base for any color.
Blush, Bronzer, and Highlight
Once you have applied foundation and concealer, your face can look a bit “flat” because you have covered up the natural shadows and flushes of your skin. This is where blush, bronzer, and highlight come in to add dimension. Blush is meant to mimic a natural flush of health. For beginners, powder blushes are often easiest to control. Smile to find the “apples” of your cheeks and sweep the color back toward your temples.
Bronzer is used to add warmth, as if you’ve spent a little time in the sun. It should be applied where the sun naturally hits: the top of the forehead, the cheekbones, and the bridge of the nose. Be careful not to go too dark; the goal is a soft definition, not a muddy appearance. In fact, for many beginners, bronzer is a step you can skip until you feel more confident with your base.
Highlighter is designed to catch the light. Apply a tiny amount to the “high points” of the face: the tops of your cheekbones, the brow bone, and the tip of the nose. Avoid high-glitter formulas which can look textured on the skin; instead, look for a “shimmer” or “sheen” for a subtle, ethereal glow. The golden rule for these three products is to start with a very small amount of powder on your brush, tap off the excess, and build the intensity slowly. It is much easier to add more color than to blend away a bright pink streak.
Common Beginner Mistakes
Learning makeup is a process of trial and error, but knowing the common pitfalls can save you a lot of stress. One of the most frequent errors is using the wrong foundation shade. Many people buy a shade that is too dark, thinking it will make them look tanned, but it usually results in a visible line at the jaw. Always match to your neck and chest for a seamless transition.
Another mistake is applying too much product. We often see influencers on screen using heavy layers, but in real life, heavy makeup can look “mask-like” and settle into fine lines. Start thin and build up only where necessary. Skipping skin prep is another major culprit for “bad” makeup days. If your skin is dry or dirty, no amount of expensive foundation will look good.
Neglecting to blend is perhaps the most visible mistake. Whether it’s eyeshadow, blush, or foundation, the goal is for one color to fade into the next without harsh borders. Finally, many beginners fall into the trap of following trends that don’t suit their face shape or personal style. Just because “heavy contouring” is popular doesn’t mean it’s right for your daily life. Focus on what makes you feel comfortable and confident, rather than what is currently “viral.”
How to Build a Minimal Makeup Kit
You do not need a professional vanity to look great. A minimal kit is actually better for beginners because it allows you to master a few products before moving on. Building a kit should be a gradual process, focusing on quality over quantity.
A solid starter kit checklist includes:
-
Cleanser and Moisturizer: To keep the canvas clean and hydrated.
-
Light Base: A BB cream or a lightweight foundation.
-
Concealer: To cover dark circles or the occasional spot.
-
Translucent Powder: To stop the base from moving.
-
Eyebrow Pencil: To frame your face.
-
Mascara: To define your eyes.
-
One Neutral Blush: A peachy-pink shade works for most skin tones.
-
One Versatile Lip Product: A tinted balm or a neutral lipstick.
By sticking to these essentials, you reduce the “decision fatigue” that comes with having too many options. Once you feel comfortable applying these items and you know how they react to your skin throughout the day, you can begin to expand. Perhaps you’ll add an eyeliner, a small eyeshadow palette, or a bronzer later on. Starting small ensures you actually use what you buy and helps you develop a signature style.
Makeup for Different Occasions
As you become more comfortable with your tools, you will realize that you don’t necessarily need different products for different events; you just need to adjust your application. For an everyday natural look, focus on a light base, a bit of mascara, and a tinted lip balm. This “fresh-faced” style is perfect for running errands or casual outings.
When transitioning to an office or college look, you might add a bit more structure. A neutral eyeshadow and a well-defined brow can make you look more professional and alert. The colors should remain muted and “polished.” For parties or special occasions, you can increase the intensity. This might mean adding a bolder lipstick, a slightly heavier application of blush, or a darker eyeliner. You are using the same basic skills—blending, placement, and color selection—just “dialing up” the volume.
The key to occasion-based makeup is lighting. If you are going to be in a dimly lit restaurant, you can afford to be a bit bolder with your colors. If you are going to be in bright, natural sunlight, a lighter hand is usually better. Regardless of the event, the goal remains the same: to feel like an enhanced version of yourself.
Confidence and Personal Style
At the end of the day, makeup is a form of self-expression. There is no “perfect” standard that you must meet. Some people love a full face of makeup every day because it makes them feel powerful, while others prefer the bare minimum to feel polished. Both are completely valid. The “rules” of makeup are really just guidelines to help you understand how colors and textures interact with the human face, but they are meant to be played with.
As you learn, you might find that you hate wearing lipstick but love a bold brow. Or perhaps you find that you prefer the glow of a highlighter over the definition of a bronzer. Embrace those preferences! Your personal style will evolve as you experiment. If a certain trend makes you feel self-conscious, ignore it. Makeup should be a source of confidence, not a source of anxiety.
There is a powerful link between self-care and confidence. Taking ten minutes in the morning to focus on yourself, massage in some moisturizer, and highlight your favorite features can set a positive tone for the entire day. It’s a ritual of appreciation for the face you have. When you feel comfortable in your skin (and your makeup), that confidence radiates outward, affecting how you interact with others and how you tackle your goals.
Final Thoughts
Starting your journey into the world of makeup doesn’t have to be a daunting or expensive endeavor. By focusing on the health of your skin, choosing a few high-quality essential tools, and practicing the basic techniques of blending and placement, you can create a look that feels authentic to you. Remember to start simple and build your collection slowly as your skills grow.
Don’t be afraid to make mistakes—makeup washes off! Every “failed” eyeliner wing or mismatched foundation shade is just a step toward understanding your face better. Focus on the process of learning rather than achieving immediate perfection. Above all, ensure that your relationship with makeup remains a joyful one. It is a creative outlet, a boost of confidence, and a way to celebrate your unique beauty. Take it one step at a time, keep it simple, and enjoy the transformation of your confidence.


