Best Ways to Recover Unsaved Excel Files
Best Ways to Recover Unsaved Excel Files: A Comprehensive Step-by-Step Guide
Losing hours of meticulous data entry, complex formulas, and carefully constructed pivot tables in Microsoft Excel is a nightmare scenario for any professional, student, or casual user. You might have been deep in a flow state when the screen suddenly flickered black, or perhaps your finger slipped, clicking “Don’t Save” on a prompt you meant to confirm. Whether it is a sudden system crash, an unexpected power outage, or a simple human error, the feeling of dread that follows a lost file is universal.
However, the modern architecture of Microsoft Office is designed with human fallibility and hardware instability in mind. Before you succumb to the urge to start over from scratch, it is crucial to understand that “unsaved” does not necessarily mean “gone.” Excel employs several background processes—such as AutoRecover, temporary file caching, and versioning—that act as a safety net for your data.
Read: How to Gauge Web Traffic to Your Business Blog
This guide serves as a definitive resource for recovering lost Excel workbooks. We will walk through seven distinct recovery methods, ranging from built-in software features to deep-system searches, and provide a roadmap for ensuring this data loss never happens to you again. By following these steps methodically, there is a very high probability that you can restore your progress and get back to work.
Why Excel Files Get Lost or Unsaved
Understanding why files disappear is the first step in successful recovery. Data loss typically falls into one of two categories: application-side failures or user-side errors.
Sudden System or Application Crashes
A system-wide crash (the “Blue Screen of Death”) or a specific Excel application hang can prevent the software from performing its final save routine. When Excel “not responding” leads to a forced closure via Task Manager, the changes held in the computer’s RAM (Random Access Memory) are not committed to the hard drive.
Accidental Closing Without Saving
This is perhaps the most common cause. When closing a workbook, Excel asks if you want to save your changes. In a moment of distraction, clicking “Don’t Save” tells the program to discard the current session’s data. Fortunately, Microsoft has introduced “On-Close” recovery features to mitigate this specific mistake.
Power Failures
If you are working on a desktop computer without an Uninterruptible Power Supply (UPS), a momentary power flicker can bypass all software safeguards. Unlike a software crash, where the OS might still be running, a power cut terminates all processes instantly.
Overwriting Files and Disabled Features
Sometimes the file isn’t “missing,” but the data is. Overwriting a complex spreadsheet with a blank template or an older version is a form of data loss. Additionally, if a user has manually disabled the AutoSave or AutoRecover features to save on system resources, the built-in safety nets are removed, making recovery significantly more difficult.
Read: Is Your Business Blog Viral Enough?
Quick Checklist Before Trying Advanced Methods
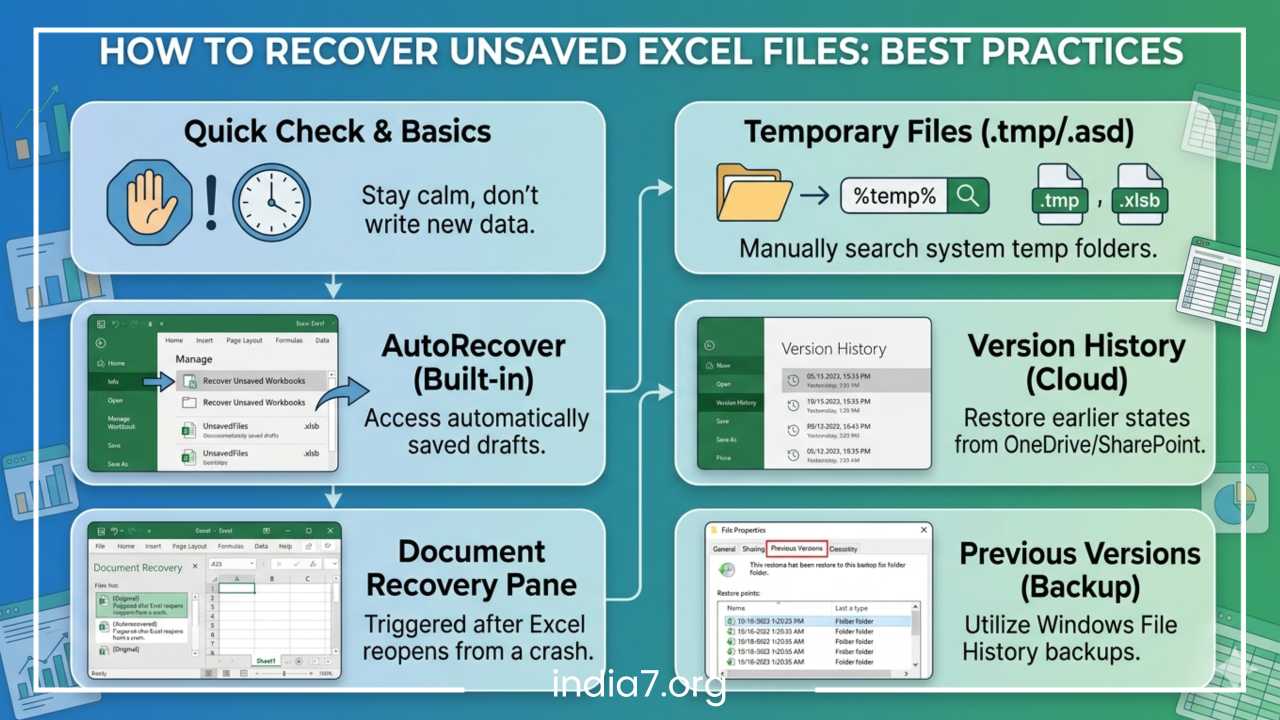
Before you start digging into system folders or downloading software, take a breath and follow these immediate protocols to maximize your chances of success:
-
Stop Writing New Data: Do not save new files or copy large amounts of data to your hard drive. Every time you write new data, you risk overwriting the disk space where your “lost” file might still reside.
-
Avoid an Immediate Reboot: While a restart can fix many computer problems, it can also clear out certain temporary folders (Temp files) that Excel uses to store unsaved work. If Excel crashed, keep the computer on while you attempt initial recovery.
-
Check for Open Instances: Sometimes we think a file is lost when it is actually just hidden behind another window or open in another “instance” of Excel. Use
Alt + Tabto cycle through all open windows. -
Note the Details: Try to remember the exact name of the file (or “Book1” if it was never named) and the approximate time you last worked on it. This will be vital when searching through timestamped recovery folders.
Read: 5 Musts Things You Should Be Doing When You’re Not Blogging
Method 1: Recover Unsaved Excel Files Using AutoRecover
Microsoft Excel has a built-in feature called AutoRecover. It is designed to periodically save a copy of your work in a temporary location. By default, this happens every 10 minutes, though this can be customized.
How to Use the “Recover Unsaved Workbooks” Feature
If you closed a file without saving or the program crashed, follow these steps:
-
Open a new, blank Excel workbook.
-
Click on the File tab in the top-left corner.
-
Select Info from the left-hand sidebar.
-
Look for the Manage Workbook button (usually represented by a folder icon).
-
Click it and select Recover Unsaved Workbooks from the dropdown menu.
This will open a file explorer window pointing directly to the folder where Excel stores its draft versions (usually in a folder named UnsavedFiles). These files end in a .xlsb extension and are named after the workbook.
-
Select the file that matches the time you were working.
-
Click Open. Once the file opens, you will see a bar at the top of the sheet. Click Save As immediately to move the file to a permanent location on your drive.
Limitations of AutoRecover
AutoRecover is not real-time. If your interval is set to 10 minutes and you work for 9 minutes before a crash, those 9 minutes of work are lost. Furthermore, if you explicitly clicked “Don’t Save” in older versions of Excel, the AutoRecover file might be automatically deleted.
Method 2: Restore Previous Versions (Version History)
This method is the most reliable but requires that your file was originally saved to OneDrive or a SharePoint library. If you use cloud storage, Excel tracks every change you make in real-time.
Accessing Version History
If you have accidentally deleted data or overwritten a file and need to go back in time:
-
Open the Excel file in question.
-
Click on the File tab.
-
Select Info.
-
Click on Version History. A panel will appear on the right side of your screen.
-
Excel will list various versions of the document categorized by time and the user who made the changes.
-
Click Open version to view an older copy in a separate window.
Restore vs. Compare
When you open an older version, Excel gives you two choices. You can click Restore, which will make that older version the current primary file, or you can simply copy the specific cells or formulas you lost and paste them into your current, most up-to-date version. This is the “safe” way to recover data without losing any progress you might have made since the accidental change.
Method 3: Recover from Temporary Files
Sometimes, the AutoRecover interface fails to show your file. However, the raw data may still exist in your computer’s “Temp” directory. Windows creates temporary files for almost every active process.
Understanding .tmp and .asd Files
When you work on an Excel file, Windows creates a temporary version of it. These files often have cryptic names starting with a tilde (~) or a dollar sign ($) and end in .tmp or .asd.
How to Locate Temp Files
The most common path for these files is within your user “AppData” folder. You can reach it by:
-
Pressing
Windows Key + Rto open the Run dialog. -
Typing
%appdata%and hitting Enter. -
Navigate to
Microsoft\Excel. -
Look for folders with names that look like your file name but contain extra characters or timestamps.
Alternatively, you can check the general Windows Temp folder:
-
Open Run again and type
%temp%. -
Search the folder for files created around the time of the loss.
-
Sort by Date Modified to find the most recent entries.
How to Open a Temp File
If you find a file you think is your spreadsheet, do not try to open it by double-clicking. Instead, copy the file to your desktop and change the file extension from .tmp to .xlsx. Then, try opening it with Excel. If the file is corrupted, you can try the “Open and Repair” feature within the Excel Open dialog.
Method 4: Use Excel Document Recovery Pane
The Document Recovery Pane is Excel’s automatic “emergency room.” It usually triggers the moment you re-open Excel after an unexpected shutdown.
How to Use It Effectively
When Excel restarts after a crash, a pane should automatically appear on the left side of the workspace titled “Document Recovery.”
-
The pane will list all files that were open during the crash.
-
Each file name will have a timestamp and a label (e.g., [Original] or [Autorecovered]).
-
Click the arrow next to the version you want to keep and select Open to inspect it.
-
If it contains the data you need, click Save As immediately.
Important Note: Do not close the Document Recovery pane until you have checked every file listed. Once you close that pane, Excel assumes you no longer need those temporary recovery files and may delete them permanently.
Method 5: Check Recycle Bin
It sounds elementary, but the Recycle Bin is often overlooked in the panic of data loss. If you were tidying up your desktop and accidentally dragged a folder to the trash, or if you used the “Delete” key on a file you thought was a duplicate, it will be sitting in the bin.
Restore Steps
-
Open the Recycle Bin from your desktop.
-
Search for
.xlsxor.csvin the search bar at the top right. -
If you find your file, right-click it and select Restore.
-
The file will return to its original location.
If you emptied the Recycle Bin, you will need to move on to Method 7 (File Recovery Software), as the operating system no longer “sees” the file, though the data bits may still exist on the platter or flash cells.
Method 6: Recover Overwritten Excel Files
Overwriting a file—where you save “File B” over “File A”—is one of the hardest mistakes to fix because the file system technically did exactly what you told it to do. However, Windows has a built-in backup feature called File History.
Using “Restore Previous Versions”
If you have File History or System Protection enabled:
-
Right-click on the file (or the folder that contained the file).
-
Select Properties.
-
Click on the Previous Versions tab.
-
If backups have been made, you will see a list of dates.
-
Select a version from before you overwrote the data.
-
Click Restore.
If this tab is empty, it means you do not have Windows Backup or File History configured. In this case, your only options are Cloud Version History (Method 2) or professional recovery software.
Method 7: Use File Recovery Software
When all built-in Excel and Windows features fail, third-party recovery software is the last resort. These tools work by performing a “Deep Scan” of your hard drive’s sectors to find data that has been marked as deleted but hasn’t yet been overwritten by new files.
When to Use It
Use this method if:
-
The file was deleted and the Recycle Bin was emptied.
-
The hard drive was formatted.
-
The file system became corrupted and the file “disappeared.”
How It Works
When a file is deleted, Windows doesn’t actually erase the data; it just deletes the “pointer” to that data and tells the computer that the space is now available for new information. Recovery software looks for those “orphaned” bits of data and reassembles them into a file.
Risks and Precautions
-
Overwriting: If you download and install recovery software on the same drive where the file was lost, the installation process itself might overwrite the lost file. Ideally, run portable recovery software from a USB drive.
-
Success Rate: Success is never 100%. Files can come back “fragmented” or “corrupted,” especially if you have been using the computer heavily since the loss occurred.
How to Find AutoRecover File Location
If you want to manually navigate to where Excel hides its emergency saves, you can find the specific path in your settings. This is useful if the “Recover Unsaved Workbooks” button doesn’t open the folder correctly.
Steps to Locate the Path:
-
Open Excel and click File.
-
Click Options at the very bottom of the sidebar.
-
In the Excel Options window, click the Save category.
-
Look for the field labeled AutoRecover file location.
Typically, the path looks like this:
C:\Users\[YourUsername]\AppData\Roaming\Microsoft\Excel\
You can highlight this path, copy it, and paste it into the address bar of your Windows File Explorer to go directly to the source. Inside this folder, you will often find subfolders named after your workbooks containing .asd files.
Tips to Prevent Losing Excel Files in the Future
While knowing how to recover files is vital, preventing the loss in the first place is much more efficient. A few small changes to your workflow can virtually eliminate the risk of data loss.
1. Enable AutoSave (Cloud)
If you have a Microsoft 365 subscription, keep the AutoSave toggle (located in the top-left corner of the Excel window) turned On. This saves your file to OneDrive every few seconds. Even if your computer explodes, your data is safe in the cloud.
2. Adjust AutoRecover Interval
The default 10-minute interval is often too long for high-intensity work.
-
Go to File > Options > Save.
-
Change “Save AutoRecover information every X minutes” to 1 or 2 minutes.
-
Ensure “Keep the last AutoRecovered version if I close without saving” is checked.
3. Use the “Save As” Habit
Before you start working on a “Book1,” save it immediately to a folder. This gives the AutoRecover system a named file to track, which increases the reliability of recovery.
4. Implement a 3-2-1 Backup Strategy
Keep 3 copies of your data, on 2 different media types, with 1 copy off-site (cloud storage). Using services like OneDrive, Dropbox, or Google Drive counts as both a second media type and an off-site copy.
Common Mistakes to Avoid During Recovery
When people panic, they often make mistakes that turn a temporary data loss into a permanent one. Avoid these pitfalls:
-
Saving New Data: As mentioned before, do not start a new project on the same computer until you have finished your recovery attempts.
-
Ignoring the “ReadOnly” Warning: If you recover a temp file, Excel might open it in “Read-Only” mode. Users often forget this and close the file, thinking they have “fixed” it, only to find the file didn’t save their latest changes. Always use “Save As” and give it a new name.
-
Restarting Too Quickly: Restarting can flush the
\Tempfolder. Try the manual folder search before you reboot. -
Using Unreliable Tools: Avoid “free” recovery tools from unknown websites that ask for administrative permissions or contain malware. Stick to reputable, well-reviewed software.
FAQs Section
Can I recover an Excel file I never saved?
Yes. If AutoRecover was enabled, Excel likely created a temporary .xlsb file in the UnsavedFiles folder. Use the File > Info > Manage Workbook > Recover Unsaved Workbooks path to find it.
Where are unsaved Excel files stored?
On Windows, they are typically found in:
C:\Users\[User]\AppData\Roaming\Microsoft\Excel\ or
C:\Users\[User]\AppData\Local\Microsoft\Office\UnsavedFiles
How long does Excel keep AutoRecover files?
Excel generally keeps these temporary files for about 4 days or until you next open Excel and choose to discard them. However, they are not permanent and can be cleared by system cleanup tools.
Can overwritten files be recovered?
Only if you have Version History (via OneDrive/SharePoint) or Windows File History enabled. If the file was saved locally on a drive with no backup system, it is extremely difficult to recover the previous version once the new bits have been written over the old ones.
Why is my AutoRecover folder empty?
This usually happens if the “Save AutoRecover information” setting was turned off, if the file was closed normally (which signals Excel to delete the temp file), or if a system cleaner (like CCleaner) deleted your temporary files.
Final Thoughts
Losing an Excel file is a stressful experience, but in the vast majority of cases, the data is still reachable. Whether it is through the built-in AutoRecover feature, the Document Recovery pane, or searching through Temporary Files, Microsoft Excel provides several layers of protection.
The most important takeaway is to act quickly but calmly. Start with the easiest built-in methods before moving toward system-level searches or third-party software. Once you have successfully recovered your work, take five minutes to optimize your Excel settings—shorten your AutoRecover interval and consider moving your critical files to a cloud-synced folder. A little bit of prevention today will save you from the “Don’t Save” panic of tomorrow.


